A 3D printer diary – printing a box

3D printing takes AGES! Even something as simple as the small container shown below takes four hours!

The 3D-printed version is on the left.
The original (injection-moulded) is on the right.

A lot of lessons were learned from this print job. The short version is as follows:

  • Don’t start a print job at 8pm. You’ll get a late night.
  • Supports are a great idea.
  • The raft underneath was a waste of time on this model.
  • The box is flimsy. See below for why.
  • My Cura settings were wrong.
  • The nozzle was still slightly blocked (as I found out a few days later).

3D printing involves layering tiny amounts of hot plastic, in layers of 0.1mm (or more, or less, depending on the printer). The software takes a 3D file (like a .STL file or a .OBJ file) and “Slices” it into hundreds of layers. This takes time. The white box above took nearly four hours to print, and I got to bed at midnight.

The observant will notice that the top of the box is a different colour. With 12 minutes to go, the white filament ran out. I cheekily pushed the end of a yellow length of filament into the top of the filament feeder, whilst it was still running, guesstimating the correct time to do so. I’m sure one is supposed to pause the model whilst doing this, but it worked for me this time.

The resultant box has weak sides, and feels flimsy. It feels like it’s made of thin paper, and the quality of the sides is terrible. There are two possible issues: one is that my settings in the Cuda software are incorrect. I’m using Cuda to add supports and the raft – because the official Digilab software won’t export in the correct format. the other issue (as I found out) was that the nozzle was still blocked.

The underneath of the box is much better than last time. Apart from a few stringy bits, it’s relatively clean. The supports were very thin, as they are meant to be, and broke off easily.

I’m not convinced that a raft was really necessary. It took 31 minutes to print the raft, even before starting to print the supports and the model. I felt that the raft was a waste of time in this case. There are good examples where a raft is important, particularly for models which don’t have a flat base.

Next, we will try giving the nozzle a really good clean, and try again.

Posted in 3D printer | Tagged , | Comments Off on A 3D printer diary – printing a box

A 3D printer diary – clogged nozzle

After printing a stringy mess, the nozzle of my 3D20 is covered in goo (filament). At room temperature, it’s a nice hard crusty smooth goo. The instructions explain how to clean the nozzle. There’s a nice video (with jolly music) that shows how to do it too:

  • Put the printer in heat mode to get the nozzle up to the correct temperature.
  • Don’t touch the nozzle – it’s 220 degrees C.
  • Remove filament from the top of the print head.
  • Don’t touch the nozzle. It’s hot.
  • Let the filament ooze through the nozzle for a bit.
  • Did we say the nozzle is hot?
  • Poke the cleaning tool in at the top and push out any filament.

I did this, and the cleaning tool went quite deep into the print head, almost to the nozzle. Then I pulled the cleaning tool out, and as I did so, I realised something had gone wrong. It felt like filament had been pulled out with the cleaning tool. I tried poking the cleaning tool in again, and it wouldn’t go. I guessed that the filament had solidified on the top of the metal part of the print head.

Schematic showing filament (in green for this diagram)

As expected, I’m not the first to experience problems like this. Here is a video, (with no sound), showing how to dismantle the print feeder, to get at the print head. Be careful not to loose the nylon spacers behind the heat-sink, behind the fan.

Photo showing my blocked print head (looking down on the steel print head). The blob of filament is white.

With filament back in the machine, a print job could be started. The results are shown below, and I’ll talk more about it in the next post.

3D printed version on the left in white.
Original (injection-moulded ABS) on the right in yellow.

Posted in 3D printer | Tagged , | Comments Off on A 3D printer diary – clogged nozzle

A 3D printer diary – supports

The SD card with the correct software was missing when we bought our Dremel 3D20 (it was a bargain). But I found the “Dremel Idea Builder” software and a firmware update on their website, and that allows me to load STL files, and send them to the printer via USB cable.

Unfortunately, the “Idea Builder” software has no option for adding supports to a model. Supports are needed so that the nozzle doesn’t print filament over an empty space.

However, Dremel now offer a new Slicing software called “DigiLab Slicer“. This is easy to use, and has options to add supports, rafts, skirts, change the print quality, and do the slicing. It saves in .gcode format. It is based on the open-source Cura software.

This is all good news … except that Idea Builder doesn’t like .gcode files. It needs its own special format of .g3drem. And DigiLab Slicer doesn’t save in .g3drem format. It would appear that I’m not the only person with this problem. Dr. Peter Falkingham, university lecturer in vertebrate biology prints models of animal bones for use in his lectures. And he has had the same problems: most slicing software can create .gcode files. but how do you create a .g3drem file?

Update 15 March – I emailed Dr. Falkingham, who clarified that the latest firmware allows the 3D20 printer to read .gcode files off the SD card. The problem I experienced exists when printing from the “Idea Builder” software via USB cable: “Idea Builder” does not read .gcode files.

Further online searching revealed that others had the same problem too. One guy wrote a plugin for Cura that saves to g3drem format. A quick installation of Cura, then a visit to the Cura Marketplace (from within the Cura software), and the plugin is installed. It isn’t supported by Cura, it comes with no warranty, except that your printer might catch fire, but I’m happy with that.

So now I can create supports for the model from the STL file, save it as a .g3drem, and load that into Idea Builder to send it to the printer.

Except that the nozzle is blocked. That’s a job for another day.

Posted in 3D printer | Tagged , | Comments Off on A 3D printer diary – supports

A 3D printer diary – getting going again

Our 3D printer (Dremel 3D20) was a bargain, because bits were missing. After five emails to Dremel support, and various phone calls, I eventually found a supplier who was willing to order the spare parts that I need – mainly the spool lock so that the spool of special Dremel PLA will rotate freely.

Using some of the spare filament that my dad gave me, I attempted to print a small box. This box has feet, so the area touching the build plate is relatively small, and the bottom of the box is off the ground. After about 15 minutes, the printer had created a stringy mess and had pushed the model sideways on the build plate … and was now attempting to add fresh filament on top of empty space.

A stringy mess – after the print head nudged the model out the way and tried to print filament on empty space.

Underneath – another stringy mess. Apparently there is software that can add supports to overhanging structures.

The main lesson learned today is to add supports to the model before printing it. That’s a job for another day.

Posted in 3D printer | Tagged , | Comments Off on A 3D printer diary – getting going again

Vintage plastic toy train

Ecoiffier toy train. Date of manufacture unknown.
Photographed at my parents-in-law

Posted in Trains | Tagged , | Comments Off on Vintage plastic toy train

AWS Storage capacity

I remember when I thought a gigabyte was a lot. I bought an external 1GB hard disk in 1995, and filled it up in no time at all. As geeky things go, it was pretty exciting.

Hadoop is designed for petabyte-scale data processing. Hadoop’s filesystem, HDFS, has a set of linux-like commands for filesystem interaction.. For example, this command lists the files in the hdfs directory shown:

hdfs dfs -ls /user/justin/dataset3/

Like Linux, other commands exist for finding information about file and filesystem usage. For example, the du command gives the amount of space used up by files in that directory:

hdfs dfs -du /user/justin/dataset3
1147227 part-m-00000

and the df command shows the capacity and free space of the filesystem. The -h option displays the output in human-readable format, instead of a very long number.

hdfs dfs -df -h /
Filesystem              Size     Used     Available  Use%
hdfs://local:8020       206.8 G  245.6 M    205.3 G   0%

The hdfs command also supports other filesystems. You can use it to report on the local filesystem instead of hdfs, or other filesystems for which it has a suitable driver. Object storage systems such as Amazon S3 and Openstack Swift are also supported, so you can do this:

hdfs dfs -ls file://var/www/html    the local filesystem
hdfs dfs -df -h s3://dataset4/      an Amazon s3 bucket called dataset4.

Here is a screenshot showing the results of doing just that (from within an Amazon EMR cluster node).

It suggests that the available capacity of this s3 bucket is 8.0 Exabytes. This is the first time I’ve ever seen an exa SI prefix for a disk capacity command. As geeky things go, it’s pretty exciting.

I assume this is just a reporting limit set in the s3 driver, and that the actual capacity of s3 is higher. AWS claim the capacity of s3 is unlimited (though each object is limited to 5TB). AWS is constantly expanding, so it is safe to assume that AWS must be adding capacity to s3 all the time.

The factor limiting how much data you can store in s3 will be your wallet. The cost of using s3 is charged per GB per month. Prices vary by region, and start at 2.1c/GB per month (e.g. Virginia, Ohio or Ireland). For large-scale data, and for infrequent access, prices drop to around 1c/GB. Assuming you don’t want to do anything with your massive data-hoard.

Using “one-zone-IA” (1c/GB/month), it will cost US$ 86 MILLION a month to store 8 EB of data, plus support, plus tax. If you want to do anything useful with the data, a different storage class might be more appropriate, and you should also expect significiant cost for processing.

Justin – February 2019

Posted in Computing | Tagged , | Comments Off on AWS Storage capacity

Mixing hobbies – Lego train on 16mm Garden Railway (part 2)

In my last post, I berated the fact that a inside-frame chassis on 16mm track wasn’t possible in Lego. The gauntlet was picked up by my friends in the adult Lego fan community, and a potential solution looks like this:

Top: Outside Frame bogie in Lego on 16mm track
Middle: Inside Frame bogie in Lego on 16mm track
Bottom: Lego track

This solution uses a piece called a “Minifig bracket” – the thin L-shaped piece has a hole on one plate and a stud on the other. In the right orientation, they can be used to hold the side frames rigidly to the middle bit. a 1×1 brick with Technic Hole (in the middle) supports an axle, which has a stop at one end that is a friction-fit in the hole.

Deconstruction of 16mm inside-frame bogie out of LEGO parts.

The deconstructed view shows the brackets in more detail.

This exact build has another problem: the axles rub against the tan-coloured end bricks. The easy solution would be to make the side frames 10-studs long instead of 8. There might be another solution … so watch this space.

Justin – February 2019

Posted in 16mm, Garden Railways, Lego, Trains | Tagged , , , | Comments Off on Mixing hobbies – Lego train on 16mm Garden Railway (part 2)

Mixing hobbies – Lego train on 16mm Garden Railway

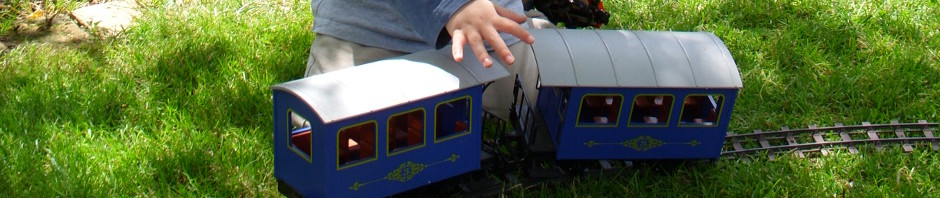
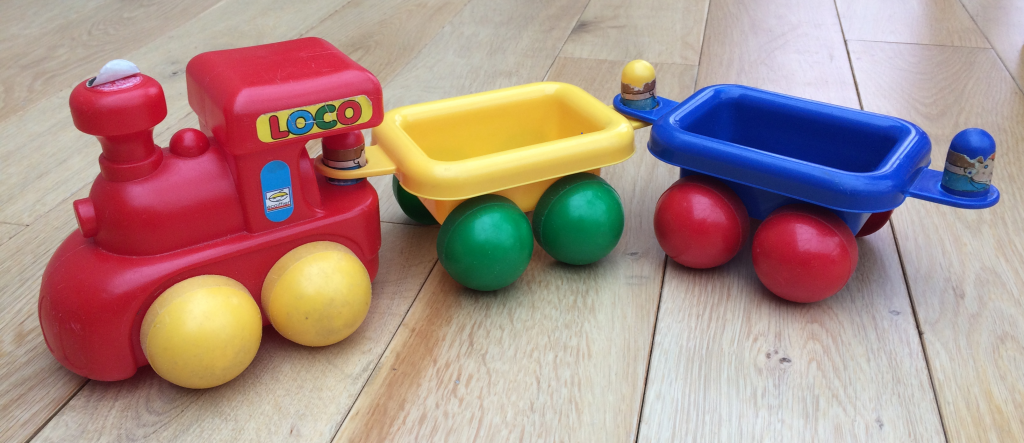
We have had Lego trains running on our garden railways before, using a chassis made of wood and metal, and bodywork made out of the famous bricks.

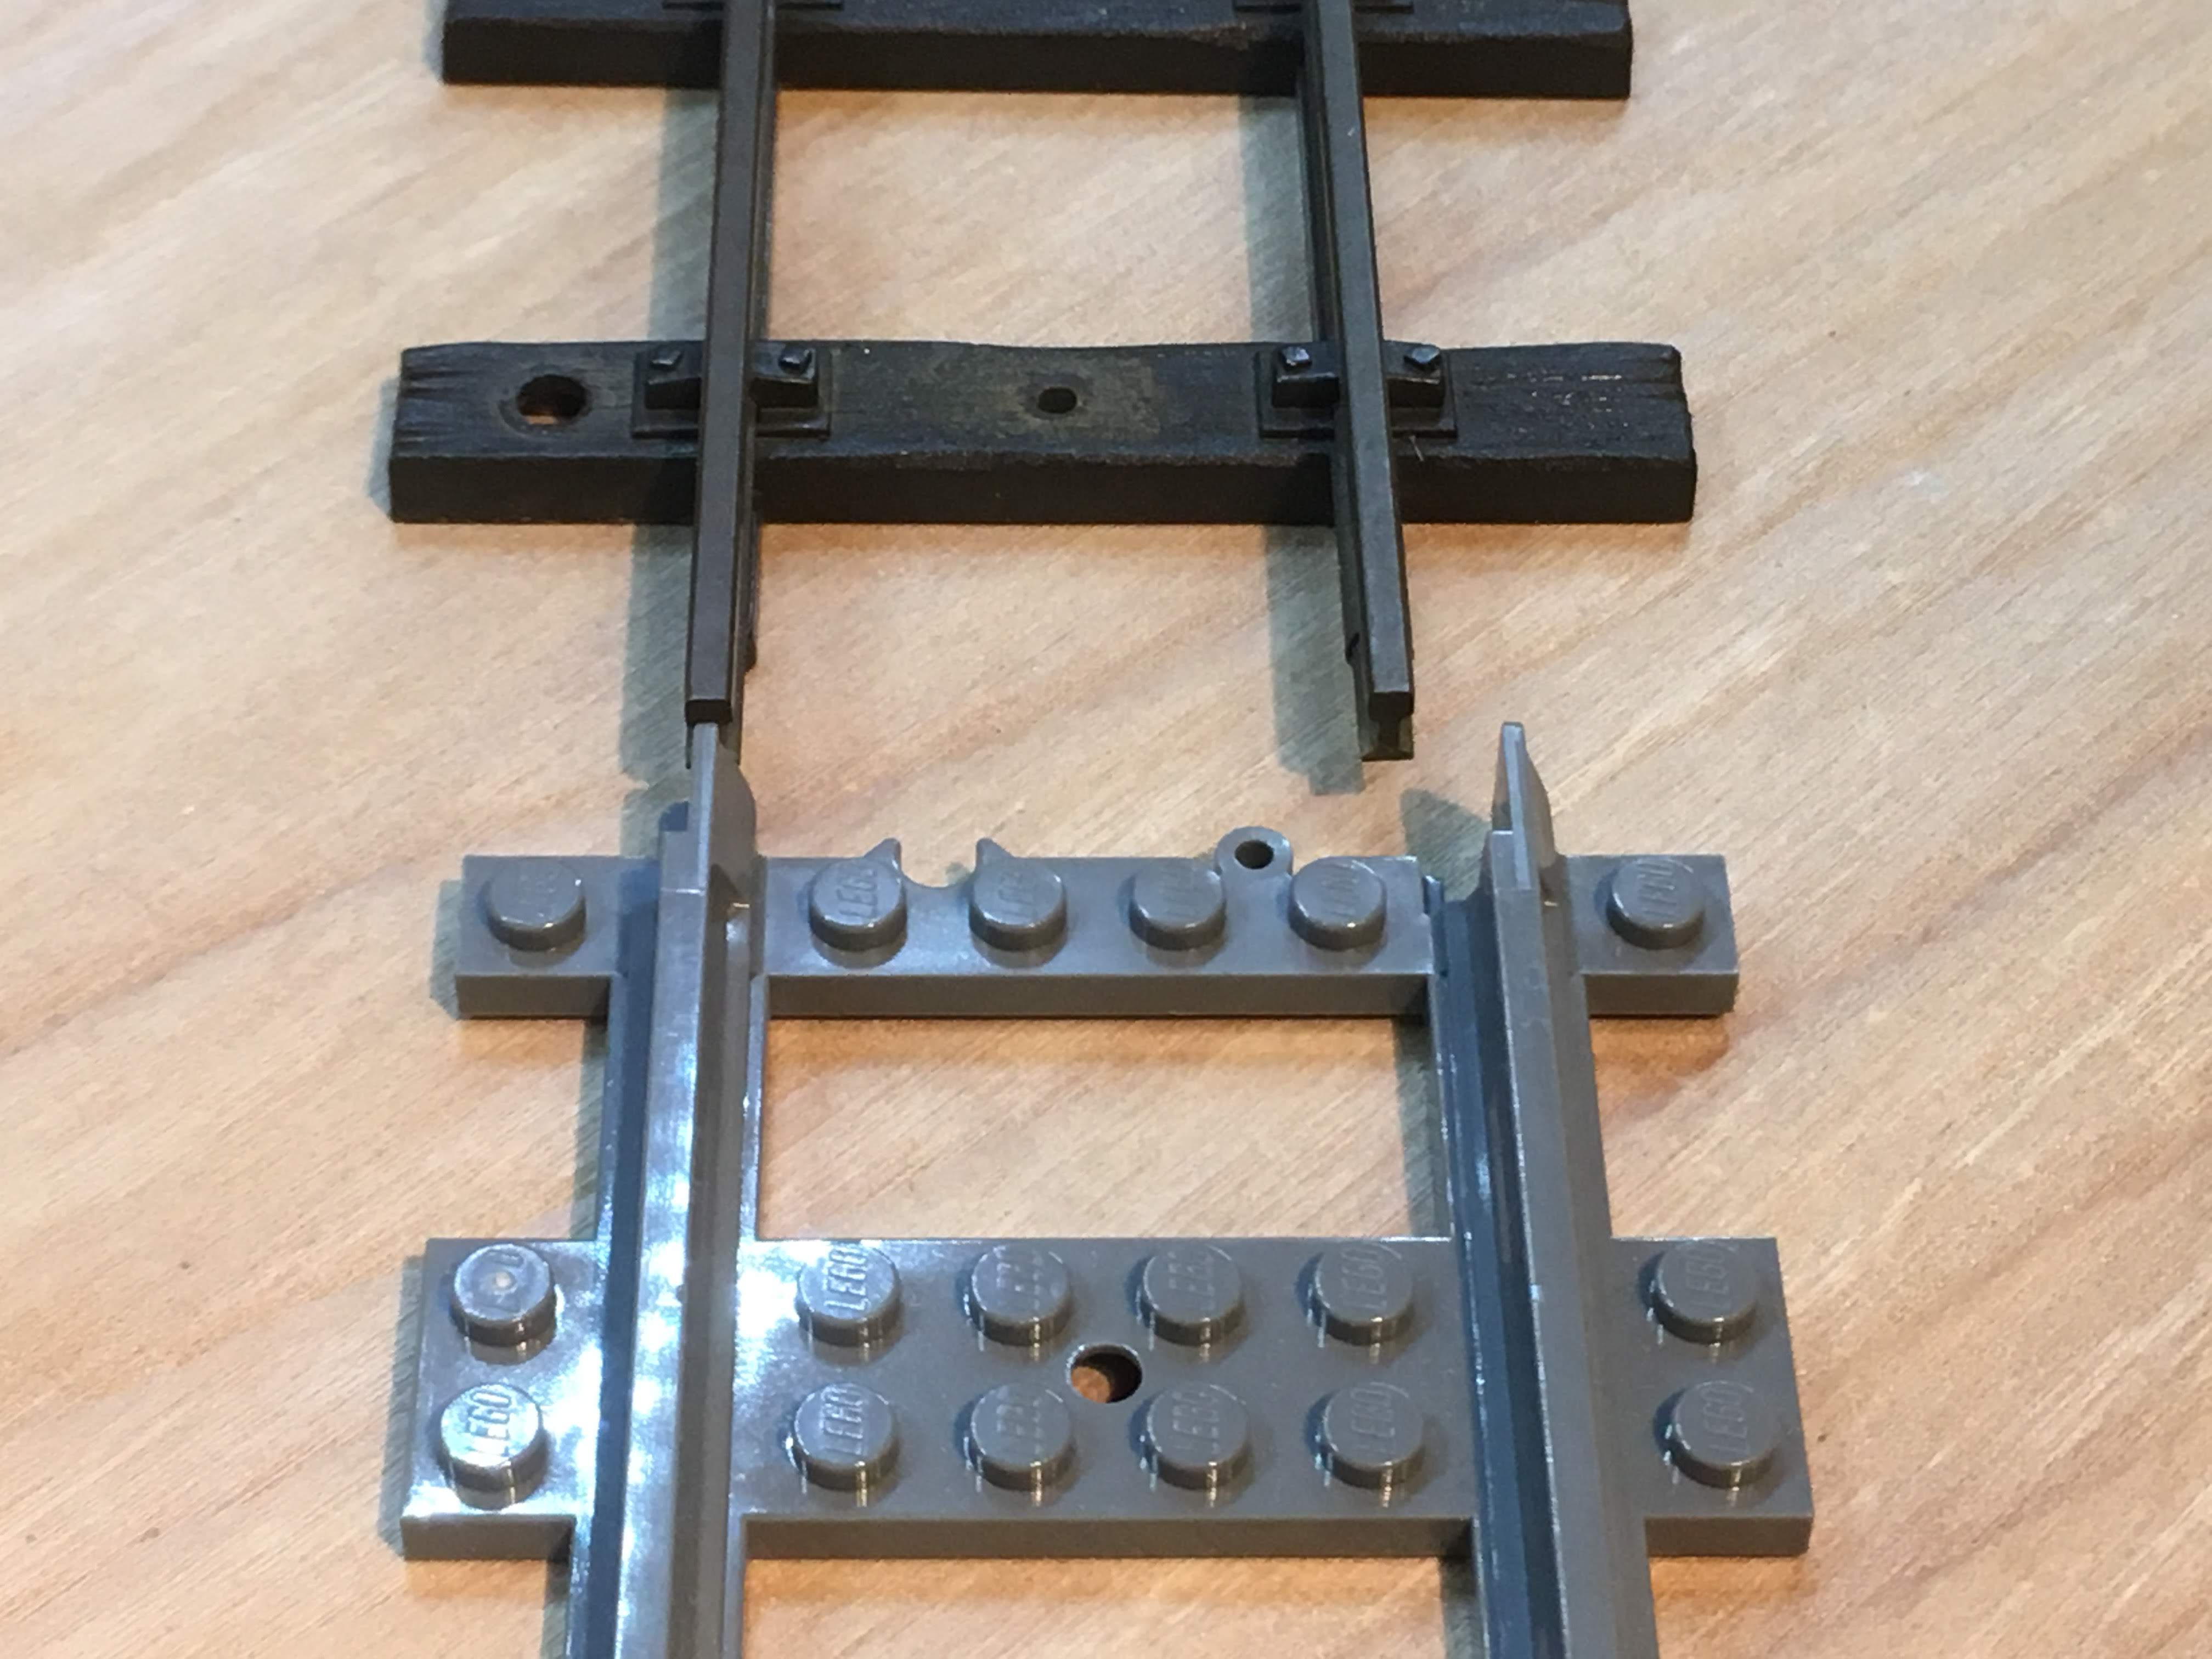
Around Christmas 2018, someone asked in the forums of the 16mm association if it is possible to re-gauge a Lego train motor to run on 32mm gauge track. This would involve cutting away at the train motor housing to make it about 6mm narrower, because of the difference in gauge between the two systems:

Custom lego train chassis for winter train

I was considering addressing the problem the other way round – rather than cutting away at the train motor, I wondered if it is possible to build a 100% Lego chassis that still works on the narrower gauge of SM32 track.

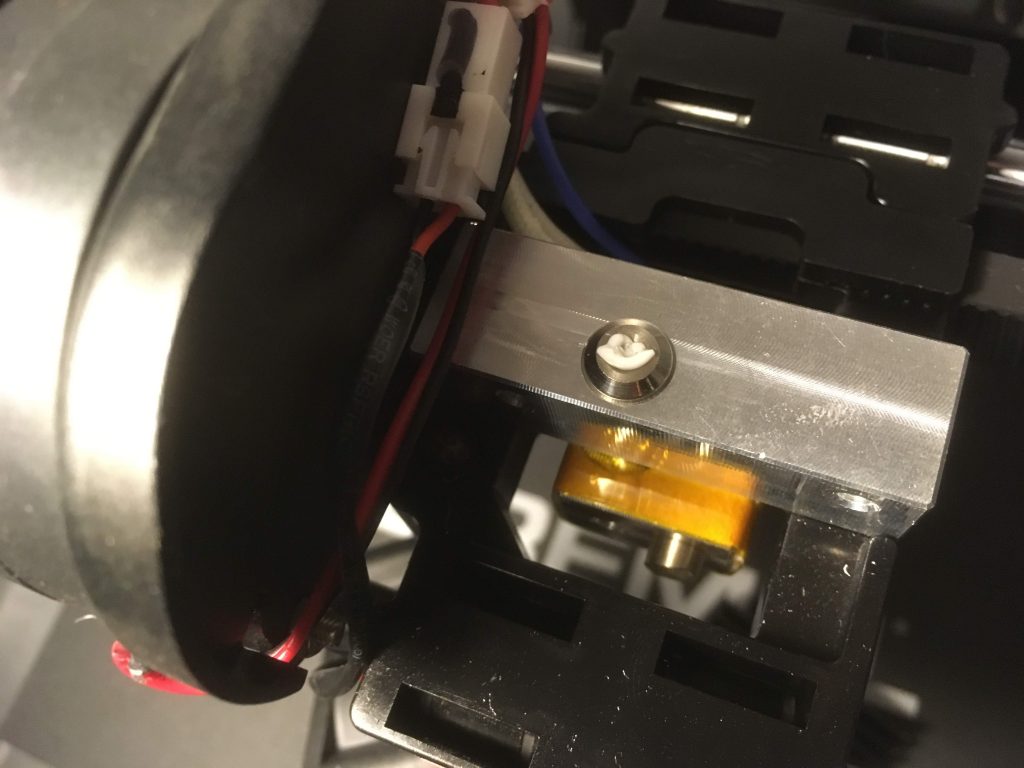
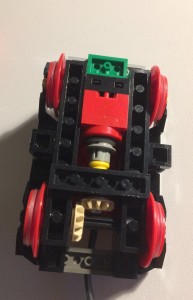
My inspiration started in December 2017, when my wife bought me the “Lego Winter Holiday Train” for Christmas. I wanted to add a motor, but the correct part was out of stock till February. So I built my own motor chassis using this tiny red motor from the 1990s, so that trains could be run on Christmas Day.  The photo here shows my motor bogie from underneath.

Is it possible to do something similar with a narrower gauge of track?

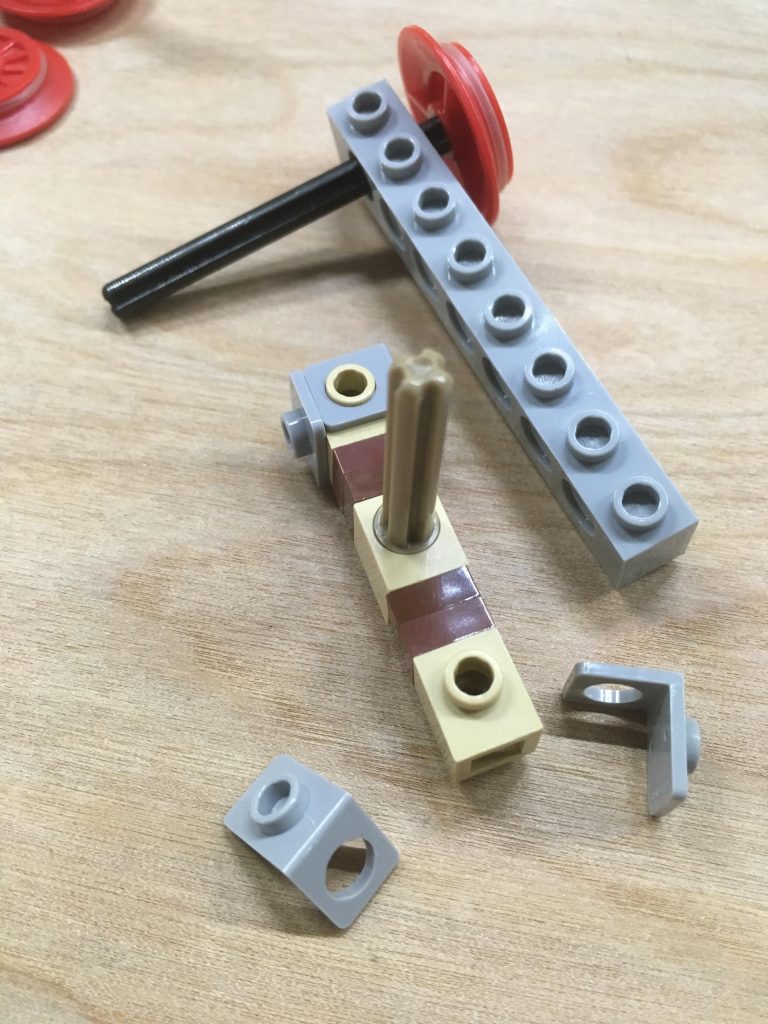
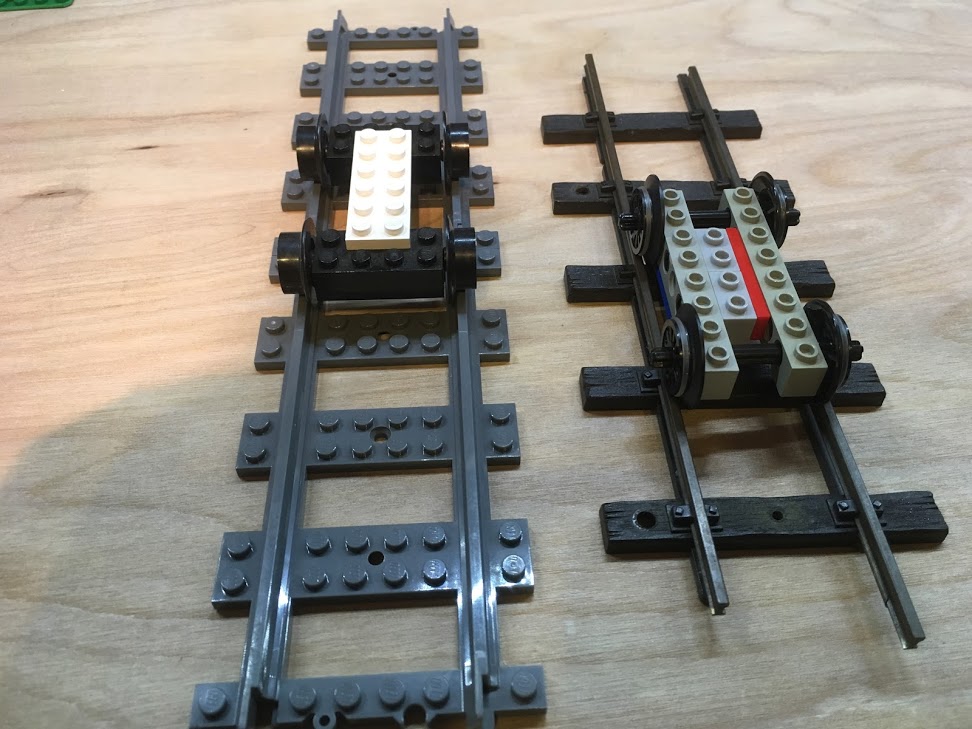
On the left is Lego track, with unpowered Lego train wheels. On the right is a short length of Peco SM32 track with my prototype. 3 1/2 studs is too wide, and one of the flanges rides the rail. To get a narrower frame, I used a tile (no studs on top) attached on its side to the blue half-pins in one side frame. The parts used to build the frame are show on the right. The axles are 5 studs long, and the wheels are train wheels with cross-holes.

Left: Lego train wheels on Lego track. Right: SM32 chassis in Lego IMG_0701

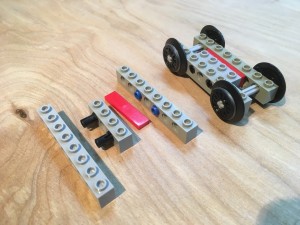
There are several problems with this solution: the two sides of the frame are only held in place by the axles, so the two sides of the frame can move relative to each other (so the axles may bind), and it would be difficult to centre anything on the bogie. (However, see this update).

Many narrow-gauge locomotives have the frames on the outside of the wheels. Would this be any easier in Lego?

IMG_0702

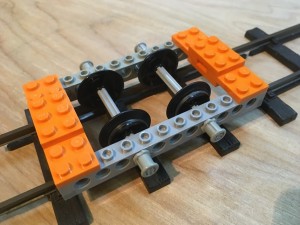
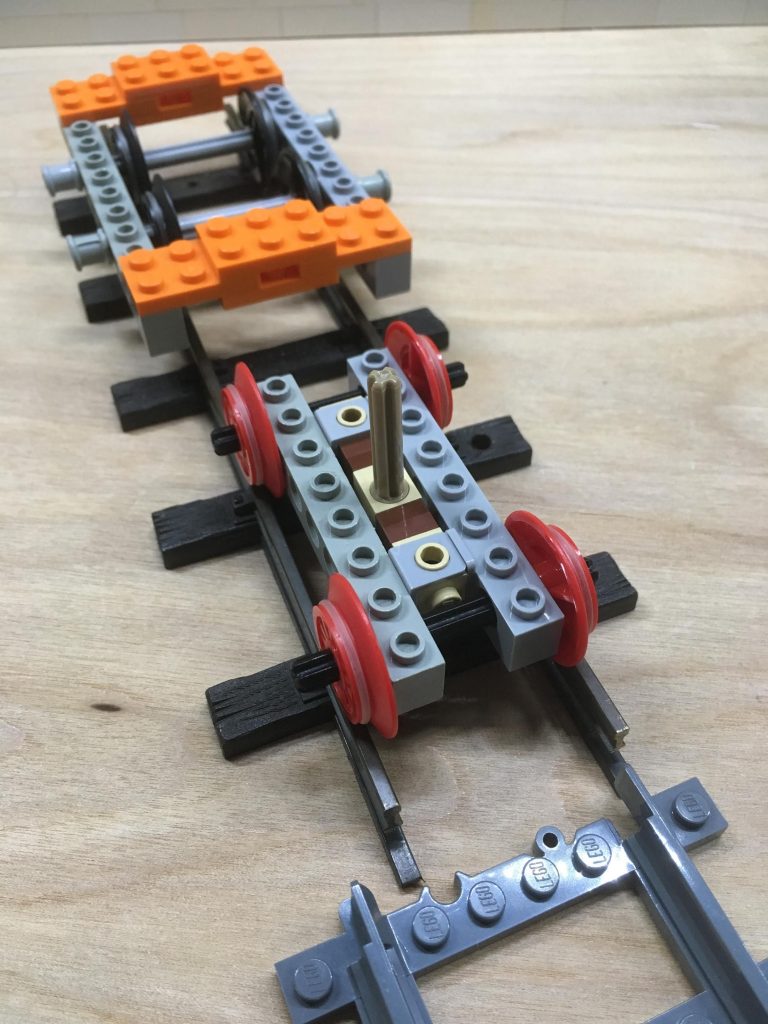
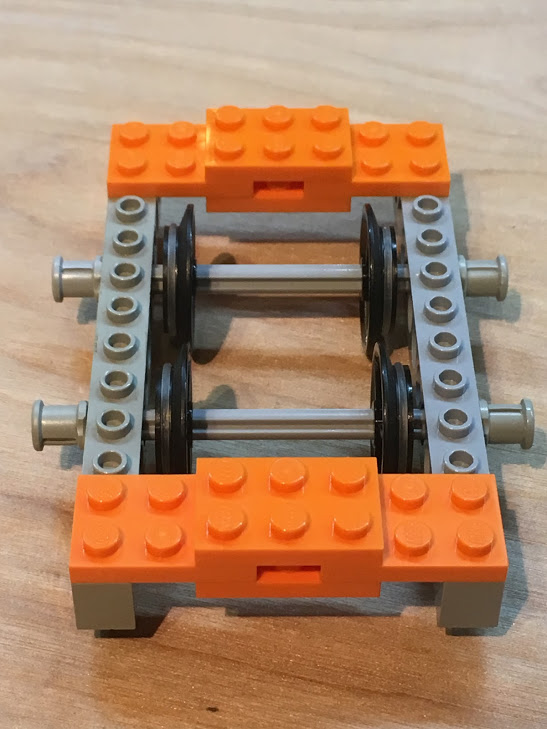
Outside frames are a more elegant solution in Lego. The two sides of a frame seven studs wide can be fixed together using bricks and plates to make a solid construction (using several 2×3 plates, in orange in the photos). I am using 9-stud axles, kept aligned by the bushes outside the frame. The wheels are set in a bit from either side of the frames. The wheels are a tight enough fit on the axle that there shouldn’t be any problem with drifting out of gauge.

IMG_0703

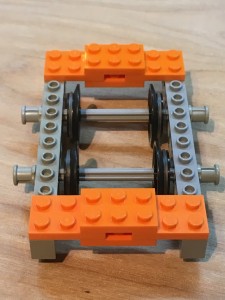
This outside frame solution has plenty of space between the axles for gears and possibly a motor. The bodywork or bogie pin can be located exactly centrally. The frames can be made rigid with relative ease, which should make for good running. Wheels of different diameters are available, in official Lego sets, in a vibrant aftermarket, and from third parties.

Both these solutions could be used to build garden railway trains completely out of Lego parts. Perfect!

Well, almost. Lego train wheels have enormous flanges, which bump along the plastic chairs on Peco SM32 track. I could 3D-print my own wheels with narrower flanges, but then it wouldn’t be entirely made out of Lego.

See an update on inside frames.

Justin – February 2019

Posted in Garden Railways, Lego, Trains | Tagged , , , , , | Comments Off on Mixing hobbies – Lego train on 16mm Garden Railway

Cygwin and the unreadable files

I have a PC which has been upgraded from Windows 7 to Windows 10. At some point during one of the upgrades, some accounts have been “upgraded”. It all looks seamless until you take a look with Cygwin, which I use to make some backups.

And herein lies the problem.

$ ls -l
d---r-xrwx+ 1 Unknown+User Unknown+Group       0 Apr  6  2014 '2007 Photos'
d---r-xrwx+ 1 Unknown+User Unknown+Group       0 Apr  6  2014 '2008 Photos'
d---r-xrwx+ 1 Unknown+User Unknown+Group       0 Apr 28  2014 '2009 Photos'
d---r-xrwx+ 1 Unknown+User Unknown+Group       0 Jun 12  2014 '2010 Photos'
drwxr-xrwx+ 1 Andy         None                0 Apr 28  2018 '2011 Photos'
d---r-xrwx+ 1 Unknown+User Unknown+Group       0 Nov 23  2014 '2012 Photos'
d---r-xrwx+ 1 Unknown+User Unknown+Group       0 Mar 23  2016 '2013 Photos'
d---r-xrwx+ 1 Unknown+User Unknown+Group       0 Dec 30  2014 '2014 Photos'
drwxr-xrwx+ 1 Andy         None                0 Jan 28 20:46 '2015 Photos'
drwxr-xrwx+ 1 Andy         None                0 Sep 24  2017 '2016 Photos'
drwxr-xrwx+ 1 Andy         None                0 Apr 28  2018 '2017 Photos'
drwxr-xrwx+ 1 Andy         None                0 Jan  9 16:58 '2018 Photos'
drwxr-xrwx+ 1 Andy         None                0 Jan  9 16:48 '2019 Photos'

All the above are really owned by user “Andy”, and have been since 2007, but somewhere along the line, maybe in a Win10 upgrade, they’be been re-owned by the operating system.

This is now a problem when I back up using a shell-script in Cygwin because I was using rsync

rsync -avz "${SOURCE_ROOT}/${DIR}/" "${REMOTE_USER}@${REMOTE_ADDR}:\"${DEST_ROOT}/${DIR}\""

This used to work, but now it doesn’t because the -a flag to rsync includes the instruction to
copy file permissions. which

A little look in the manual reminds me that -a is a combination of other
flags (-rlptgoD), and that includes the -p flag meaning “copy file permissions”. So
my rsync command now looks like this:

rsync -rltovz

I did also find a way of seeing these strange owners in Windows, but it was quite hidden: Right click on the folder in question and click “Properties”, then look in the “Sharing” tab:

Who’s that “Unknown Contact”? I suspect that’s actually the GUID of the original “Andy” account.

Posted in Linux, System administration, Windows | Tagged , , | Comments Off on Cygwin and the unreadable files

A 3D printer diary – printing an accuracy test

We bought this printer in a sale. It was missing a few important parts, including the SD Card with software on it to control it from a laptop. Without that software, we would be limited to the four models that were already in the printer.

I wasn’t able to find the contents of the SD card, but I found some software online. The Dremel 3D printer website must have changed since the instructions were produced, because the software it referred to has vanished, and there was something else instead … which also requires a firmware upgrade.

Connecting the USB cable, the printer wasn’t recognised by my ancient laptop. I cheated and borrowed my wife’s laptop (newer version of Windows, newer hardware), in order to install the firmware. Once that was done, I re-installed the Dremel3D software on the ancient laptop, and it detected the printer OK.

3D printed brick

I imported a Lego-compatible brick (Thingiverse item 1729056), and printed it from the Digilab 3D slicer software, via the USB cable. Using “standard” resolution (0.2mm layer height, 25% infill, 220 degC), it took 18 minutes to make a 2×4 brick. The software estimated 0.88m of filament. The brick is mostly compatible with real LEGO, which suggests it is a remarkably good test for the accuracy of the printer.

Posted in 3D printer | Tagged , , | Comments Off on A 3D printer diary – printing an accuracy test