Andy's Garden Railway
Originally written 1999. Updated to 2016
About my railway
I'm building a railway in my garden. It's a narrow gauge railway, in 16mm/ft scale. In this scale, a model person would be about as tall as your middle finger.As a result of moving house several times, I've built, and dismantled, three garden railways, and I'm currently building my fourth. Here is a brief history of the railways I've built.
The first railway
My first garden railway was an oval of track, screwed to creosoted scrap timber, and laid onto the ground in a rockery. This was fine in the short term, but it wasn't a particularly large oval. After a year or two, the plants in the rockery started to take over, growing between the sleepers. Sometimes this made it difficult to run a train. Also, the timber base was in contact with the ground, so it soon started to rot.
This railway was 45mm Gauge, and I'd decided to switch to 32mm gauge as that was what other garden railway folk in the area were running on, and I wanted to run trains on their lines, and invite them over. So, a decision was made to build a new line in 32mm gauge.
That said, it was very enjoyable, especially when there weren't plants all over the track. I could put a train down and leave it to run around the circle whilst I did some gardening. It seemed so right, to have the train appear from behind a rock and continue on its merry way, whilst I weeded a different part of the garden.
The second railway
The second railway was going to go around the garden at ground level. I cut a trench in the lawn, and laid a row of bricks on sand, trying to get the whole thing level. I enjoyed building it, but for the life of me, I can't remember why I didn't lay the bricks properly, on a sand-and-cement base (it would probably have been easier to get it level if I had!).
...a row of bricks laid in a trench on the lawn...
 I had built some rolling stock for my railway by this stage (you can
read more about the loco here). I used it to test the line,
and put screws and
wall plugs in wagons as I went along fixing the track to the bricks. The loco wasn't very powerful
as it didn't have much weight, and even though I thought I'd got the track level, the
loco showed there was, in fact, a slope, a gradient. It wasn't level enough.
I had built some rolling stock for my railway by this stage (you can
read more about the loco here). I used it to test the line,
and put screws and
wall plugs in wagons as I went along fixing the track to the bricks. The loco wasn't very powerful
as it didn't have much weight, and even though I thought I'd got the track level, the
loco showed there was, in fact, a slope, a gradient. It wasn't level enough.
The circuit was about 1/4 complete in the spring of 2000 when, owing to a job move, I had to play Dr. Beeching 1, and lifted my entire railway. We decided to dig the first turf on the new Railway as soon as the dust and paperwork settled.
Lessons Learned from the first and second railways
- Untreated timber on soil is fine for a temporary line, but doesn't last a season.
- A line at ground level is hard on the back, even when you're young.
- A ground-level line near a lawn means difficult edges to keep trimmed.
- Securing track to housebricks using wallplugs works well. Use brass screws.
- A concrete edge to the lawn is great for weeding up to, but not good for drilling into.
The third railway; the MLLR
Whilst we were moving house, we planned the third railway. The 'directors' of the railway insisted on "some wiggles", and a "nice bridge", and the 'Engineering department' considered a number of interesting features to add, such as a "Gauntlet Bridge" 2. Various 'local people' (i.e. our friends) expressed a desire to see a "round-the-pond" service, for which a pond would be necessary, and a tunnel, for which the Directors sought expert advice on moving mountains, as the new terrain was not particularly hilly.
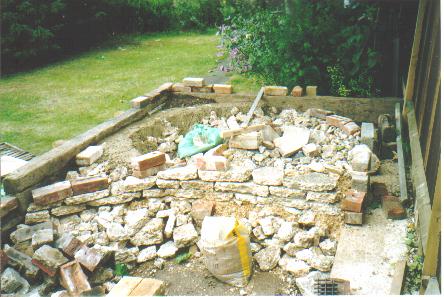
 By May 2001 The new line had been designed and the groundworks were started. The intention
was a complete circuit as per the diagram.
By May 2001 The new line had been designed and the groundworks were started. The intention
was a complete circuit as per the diagram.
The black line is the trackplan. The green lines mark the raised borders (made of real railway sleepers). Between the two raised borders was a tree, and the line was to cross on a large bridge here (shown in red). Because of the lie of the garden, a rising loop was required. which would also add operational interest.
The balloon loop on the left of the diagram was constructed, as a circle of track. (see construction photos below) This would provide an initial running track, whilst the remainder of the line was developed. The line was tentatively called the Maple Leaf Light Railway, because of a large Maple tree elsewhere in the garden.
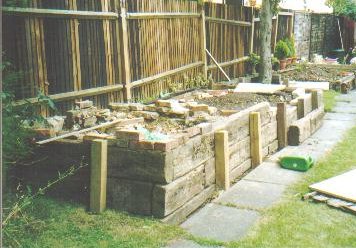
MLLR Under construction, view of left-hand raised border.
MLLR Under construction, view of top balloon loop as a circle.
However, the remainder of the line did not get developed. Another job move in Summer 2002 meant ripping up the circle of track, boxing everything up and preparing to build again, from scratch.
Lessons Learned from the third railway
- Don't build a raised border from real railway sleepers - they ooze tar in the summer.
- Bricks make a good track base. Do allow 20-30mm for mortar under the brick.
- A gradient of 1-in-50 on a 7ft (215cm) Diameter curve (the proposed rising loop on the MLLR) was probably not going to work anyway!
- Clearance under a bridge should be more than 9 inches (23cm) if possible.
- Starting with a manageable section of railway allows you to play trains sooner.
Interregnum
We knew that our new house would require some work doing to it, and that it would be a while before we got a chance to build a railway at the new place. We optimistically anticipated that we could start railway construction sometime in 2003.
So, before moving, I made a portable railway using second hand shuttering ply. It comprised 8 sections which made an octagon, with a circle of track screwed on. The aim was to be able to set it up quickly to be able to play trains, even before my new garden railway was ready, and I had hopes that once I started construction, the octagon could be converted into a balloon loop so I could get continuous running quickly.
However, plans changed, and a major house renovation project put railway construction on a back-burner. The octagonal plywood track was set up semi- permanently in the garden but forgetting to weatherproof it with creosote substitute did not helped its longevity. (Will I learn from my own mistakes?)
The delays in starting a railway have been a blessing in disguise, because they've given us more opportunity to design the railway, and work out what we actually want. On paper, the railway has moved about the garden quite a bit, and has changed design considerably. The portable track has been used on a number of occasions, and currently qualifies as the longest-lasting railway I've made (5 years).
Update: Autumn 2007, The plywood started to rot, marking the end of the portable railway. The trackwork went into the shed to be reused, and the plywood went in a skip we conveniently happened to have at the time.
Lessons Learned from the Portable track
- Woodlice are your friends. If you see them on the timber sections of your railway, it means the wood is nice and damp, which is great for woodlice, but not at all great for the long life of your railway. Brush them off and apply some stuff to protect the timber.
- or don't use timber
The fourth railway
In 2007, the children and I started building the new, permanent railway in the garden. By the spring, concrete foundations had been cast, and bricklaying had begun. The aim was to have a circle of track on a brick base, from which the railway could be expanded at a later date.
By June 2008, the brick circle was complete, and I was able to start laying track. As I prepared the track panels, I realised some of them had already been used on three previous railways over the last ten years!
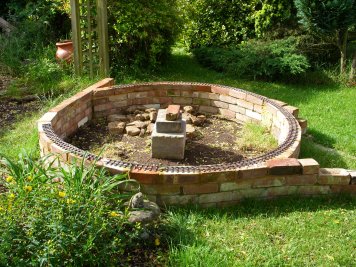
Brick circle with ¾ of a circle of track.
The circle of track was completed on Fathers Day, and the latter part of the afternoon was spent running a train. It even had some passengers, thanks to some toys from the children.
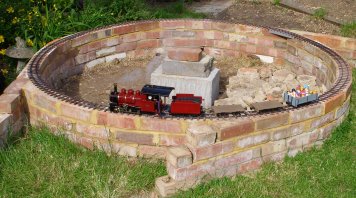
Fathers' Day present: a chance to play trains.
May 2010 update
The two years since the photo above were mainly occupied on other things. However, with the circle of track down, I was able to run a train again at long last. I also made a start with the track base for the rest of the railway.
Over the late May bank holiday in 2010, I built a tunnel and approach cuttings for the other end of the railway. The tunnel sides are constructed using patio slabs on edge set in concrete. More patio slabs will make up the top, providing a flat surface for another track to run over.
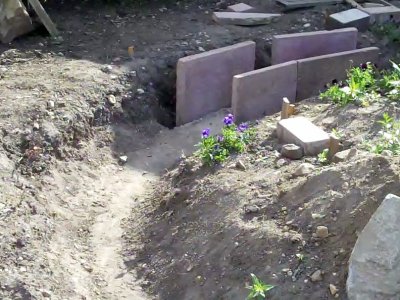
Tunnel under construction.
In the photo above, you can see the concrete track base which runs through the tunnel. That was cast in the summer of 2009.
I wanted to create the effect of a cutting either side of the tunnel. It just happens that there was a rockery in our garden when we moved in, and I'd kept all the rocks for exactly this purpose. Choosing ones with flat surfaces, and lining them up along the edge of the track base produced a cutting (and some sore muscles - those rocks are heavy! Do take care if you're going to try this yourself.)

Tunnel approach made of rocks.
You can see the tunnel towards the back of the photo, with a vertical slab covering the entrance.
To make sure the rocks were stable, I mixed up a slurry of mud and water, and sat the rock in that, a bit like mixing concrete and setting a brick into it. It felt like making mud pies in a bucket, but it enabled me to create a perfect "mould" of the rock for it to sit in, so it wouldn't wobble.
I suspect it'll be necessary to mix some mortar to fill in the joints between the rocks, otherwise all the soil will wash down the cracks and cover the track (when I eventually get the track in place!)
You'll notice that the tunnel isn't very long, and it's on a curve. Tunnels on a garden railway shouldn't be more than 2 arms lengths long, just in case you need to evict a hedgehog or a misbehaving locomotive. The fact that it's on a slight curve shouldn't be a problem. I still have to cut the top slabs into "keystone" shapes so they fit together properly.
Locomotives
The first loco I bought was a Lehmann Magic Train. I've modified it to run on batteries rather than having to wire up a controller to an outside track. I built a tender to house the batteries. This loco is 45mm gauge. It still gets played with, and I've made it child-safe by removing all the fiddly detailed bits which could get knocked off. I keep a circle of track of it to run on.
![[Image]](photos/billy_s.jpg)
My 0-4-0 steam loco. Photo
from Roundhouse Catalogue. |
I also inherited a Mamod 0-4-0 and converted it to
Meths power. It's been banned from other club gardens, because it goes too fast, and it's
a serious fire hazard. (I think this means I'll have to obtain a better regulator for it,
and get a butane burner instead). The lovely light blue paintwork has been ruined by a
Meths cab-fire. One of these days, I might get around to cleaning it up and getting it
running again.
|
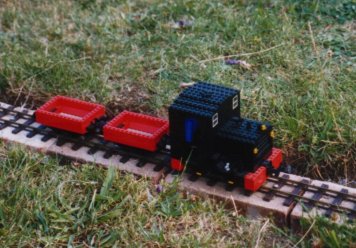
The Lego Loco in Harwich
|
I wrote an article for AWNUTS magazine describing the locomotive. You will find more picture here. She tends to pull some modified Binnie 5 Wagons.
Update! (2006) After several years of faithful service, Lego Loco is now in the workshops with drivetrain problems. There are higher priorities, so it may be a while before she's back in service.
Update (2010) A new chassis means the Lego Loco is back! Management will have to have a word with the maintenance depot about how long things take to get repaired!
More information
You will find lots more useful information in my Garden Railway Guide
Footnotes:
- Dr Beeching was the government minister in charge in the UK when large sections of railway were demolished during the 1960s.
- A Gauntlet Bridge is a bridge where two rival railway companies clubbed together to buy the one bridge. The bridge is only one lane wide, but the track layout is such that it is impossible to get onto the other company's rails. (An example of gauntlet track can be found here: the tracks interleave, but don't join or cross. In the case of this photo, it gets double track through a narrow cutting.)
- LegoTM This site is not affiliated to, nor sponsored by Lego. I just happen to like their product.
- Brandbright. They were a great mail order supplier of all things for the Garden Railway, but have ceased trading following retirement.
- Binnie Engineering. You'll probably find an advert in the Garden Railway press.
© 1999-2016 Andy Watkins andy@wis.co.uk